What is involved in a VelocityNet fibre installation process?
First, thanks for considering VelocityNet! We’re here to try and make your fibre install process easier. If you have any questions or queries at any point, please let us know on 03 218 4489.
The Basic steps to installing your VelocityNet fibre:
- We contact you to arrange a site visit and/or a contact with your builder (if the premises aren’t yet finished). Ideally contacting us early is better – we can advise your builder / electrician on best placement for pre-laid connection runs (‘ducting’) before landscaping and/or gib-walling is done, saving effort & disruption later. If ducts are not already present, we can work around this for you, the job just becomes a little more involved (eg making sure we know where other services are – eg water lines – while doing exterior trenching in the garden). At this point we may also document your requirements eg preferred locations etc photos so when you confirm the work you can be sure everyone is certain what you’ve discussed and agreed.
- From the site visit, we determine an installation plan & confirm this with you – eg
- where it will enter the building externally
- the path to get the fibre to the building from the street
- where the main optical interface unit (‘ONT’) will be installed
- where the wifi router will be located (and if extra internal ducting/cabling is needed)
In most modern houses, there is already some provision for IT network services but we’ll need to discuss your needs re Wifi coverage etc as well – in some cases we may recommend extra wifi access points as well. Any extra costs are finalized at this point.
- You agree to the installation and confirm a date when we can have access to the premises; we confirm availability of our installer(s)
- On install day our technicians will
- get the fibre duct (outer conduit) from the street to your house (via existing ducting or a new trench agreed with you) into a small ‘ETP’ box (External Termination Point)
- Blow the fibre via the internal ducting to the ITP (Internal Termination Point). We use compressed air – the fibre itself is literally as fine as a strand of hair.
- Install the Fibre ‘ONT’ (Optical Network Terminal) connect it up with the ITP
- Install & configure your wifi router to provide your internet connection.
- Confirm your connection is ‘live’ and ready to go
- Perform any additional work as agreed.
Installation Considerations
- As stated in the ‘Basics’, existing conduit pipe/ducting that we can use to pass the fibre through makes any installation considerably easier, as well as avoiding disruption for you (eg disturbing landscaping, work in ceiling spaces etc). If we do need to perform exterior trenching to get the fibre to the house – not always as bad a it can sound, depending on placement it can be done to spade depth – we do need someone available on site to direct us to the preferred placement (and to note the path used so the cable isn’t dug up/accidentally damaged later).
- Standard Installation pricing includes up to 20m of fibre duct from the entry point at your boundary to the ETP box location on your house; for various technical reasons (eg presence of other services or obstacles in the street) VelocityNet will specify the preferred point both on your boundary where the fibre will enter your property and where the ETP should be placed on your house. If these are unacceptable and you require a change to these points, any extra distance (in the street, or to allow for the new ETP/ITP locations) will count towards this 20m of allocation as well. Beyond this 20m allocation VelocityNet will provide a costing for the extra work so you can make an informed decision.
- VelocityNet standard installations include a standard router to both provide Wifi access and also allow overall connection to the VelocityNet network. Depending on the location where the fibre enters the house – and sometimes the physical layout of the house – the wifi coverage may not be optimal. In some cases existing house network wiring may allow us to relocate the wifi router to a better position, but in others we may recommend
- Extra cabling to allow for relocation to a better (more central) point
- Extra Wifi ‘access points’ to give extended coverage
In both these case we will clearly propose the extra costs involved so you can make an informed decision.
After Installation
VelocityNet Support is available on 03 2184489 in most cases we can perform remote diagnostics and correct issues remotely.
We’re also available on the same number to discuss any plan requirements you have in the future.
Legalese
VelocityNet retain ownership of the fibre and ONT supplied. In the case of any property sale, this should be made clear to any new owner, and any VelocityNet labels must be left clearly in place.
Any repairs to any VelocityNet owned equipment shall only be performed by VelocityNet technicians.
Cabling and ducting provided to you (and any optional equipment you decide on) are your property once installation is complete. In the case of any future property sale, for any active devices (eg access points)
- They can be transferred to any new owner (eg as chattels) – please notify us so we can be sure they are reset/removed from remote management services (if any) at VelocityNet
- You can take them with you (remember the power packs if any)
In all cases you agree that all items are your responsibility in case of any damage and/or loss; for VelocityNet owned items, we may require you to replace damaged item(s) so VelocityNets’ future ability to provide a service is preserved. This applies even if you choose to not have a current service with us. This is standard practice for fibre infrastructure in NZ.
Current access plans and the Terms & Conditions for those plans will be available on the VelocityNet website www.velocitynet.co.nz and are subject to change without notice; not all plans are available at all locations or on all technologies.
Installation technical information
Usual practice is to have a telecommunications ‘duct’ (feed pipe) laid from your building to the boundary of your property during construction, generally when all other main underground services are installed. This can be in a shared trench with the other services including electricity / gas / water and would usually be managed by your builder or electrician.
Things to consider:
- Each residence to be connected must have an individual lead-in cable laid from the network access point (street pillar) to the building.
- We strongly recommend the fibre lead-in cable should be installed in a lead-in pipe/duct. Without a duct/pipe as protection, the risk of future fibre run damage is elevated.
- As a minimum, Building Regulations require:
- Telecommunications cables must leave buildings through their own conduit, and this must not be shared with power cables.
- A lead-in cable can share a trench with other services, but requirements for placement clearances must be met:
- Gas lines: 300mm crossing, 450mm if parallel
- Sewer / stormwater / water: 150mm minimum
- Power (< 1000vAC): usually 450mm, check with your electrician
- If you’re unsure about the type of power cable present, contact your power or gas company. For sewer and water pipes, contact your council.
- However, in some instances where the distance of the house from the road is substantial, some of the lead-in cable may have to be direct buried. These areas should be noted so future landscaping/digging doesn’t risk damaging the installed fibre.
- For a new build we recommend a cast lead-in pipe is placed into your buildings’ foundation. This allows the fibre cable to exit the lead-in pipe inside your wall cavity. Ideally your builder & electrician can organize this for you.
- A lead-in cable can share a trench with other services, but requirements for clearances must be met, as shown below.
- If a built-in lean-in pipe is not present, the alternative is an ETP (External Termination Point) box on an external wall to bring the lead-in pipe through the wall. Building regulations require this to be between 300 – 1500mm above the finished ground level.
- For both forms of fibre cable entry, we suggest as a minimum that the internal exit point is via a flush box at a workable height in the vicinity of your mains power cable point of entry
- Access to and terminating at a network terminal (‘ONT’) is VelocityNet’s responsibility. The fibre and the ONT remain VelocityNet’s property.
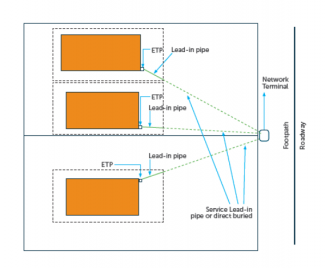
Plan view of a lead-in installation (urban)
- Individual lead-in pipes to each living unit e.g. flat, house etc.
- Lead-in pipes are to be kept as straight as is practical.
- The ETP, if used, is the connection point for the internal to external wiring.
Clearances
If you’re unsure about a type of power cable, contact your power or gas company. For sewer and water pipes, contact your council.
- Power: See the table below
- Gas pipelines: (Pressures 420 – 2000 Kpa)
- Crossings: 300mm minimum
- Parallel: 450mm minimum
- Sewer, Storm-water, Water etc: 150mm minimum
| Power Cable Voltage | Power Cable Type | With Mechanical Protection Installed | Minimum Seperation |
|---|---|---|---|
| Low voltage – exceeding 50V AC or 120V ripple free DC, but not exceeding 1000V AC or 1500V DC | Neutural screened or armoured | No | 150mm crossing 300mm parallel |
| Yes | 50mm | ||
| Other than neutral screen or armoured | No | 450mm | |
| Yes | 50mm crossing 450mm parallel | ||
| High voltage – any voltage exceeding 1000V AC or 15000V DC | Single or Multicore | No | 450mm |
| Yes | 150mm crossing 450mm parallel (2.4km max parallel length) |
What will it cost?
The cost for a VelocityNet fibre installation varies per subdivision, but starts at $499 inc GST.
In cases of install distances being greater than 20m from the street to the premises, these will be quoted on a case-by-case basis based on the extra distance to be covered and any works that may be required.
For larger houses, one or more WiFi access points (APs) may be recommended to provide sufficient WiFi coverage and speed throughout the whole house. As an indication, access points currently cost $300 incl. GST each.
Each AP also requires a connection eg network cable (for their data & power connections) and a mains power point. Most modern houses have structured network cabling built in (eg a central network cabinet, extra network sockets around the building) allowing for easy integration of extra devices. However for older houses or custom AP placement, some additional network cabling installation may be required – this work will be charged at cost for time/travel & materials.
Velocitynet
Copyright © 2024 VelocityNet | E&OE